


Capturing the Magic of Holiday Light Displays: Tips and Tricks for Stunning Photos
Blog | December 12, 2023
The holiday season brings forth a magical ambiance, illuminated by the sparkle of festive lights adorning streets, homes, and public spaces. For those heading out on one of our Holiday Light Tours, this is a fantastic opportunity to capture the enchantment of these displays through your lens. Whether you’re using a professional camera or your smartphone, here are some tips and tricks to help you take stunning photos of holiday light displays:
Camera Settings for Holiday Lights Photography:
-
Adjusting Shutter Speed:
If your phone or camera allows manual control, lower the shutter speed to allow for a better glow-effect and to mask the electronic flicker in the lights that a faster speed would capture. Experiment with speeds between 1/60th of a second and 1 second.
-
Lower ISO:
Keep ISO settings low to reduce noise in your images. The lower ISO will also allow you to use the slower shutter speeds recommended for lights photography. Our resident shutterbugs recommend keeping your ISO at 400 or lower!
-
Aperture:
On smartphones, the aperture is fixed, but you can create effects by using the Portrait and other modes or adjusting the focus manually. 3rd party camera apps and different lens options can allow for additional control. For a starburst effect, use a smaller aperture – in the f/16 to f/22 range. A wider aperture – in the f/2.8 to f/5.6 range – will provide background separation from a foreground subject and more of a bokeh blur effect on background lights.
-
Turn off Flash:
Using the flash can ruin the ambiance of the lights. It will also highlight foreground elements to overexposure while leaving background elements too dark. Rely on ambient light instead.
-
White Balance:
Experiment with white balance settings to capture the true colors of the lights. Try “Tungsten” or “Incandescent” for warmer tones. If you’re looking for more of the traditional blue hues of night shots, consider setting it to 3200k.
Shooting in RAW Format:
For those with the option, shooting in RAW format (if available) allows for greater flexibility in post-processing, especially for adjusting exposure and colors without losing quality.
Low Light Shooting Techniques:
Camera Stabilization:
- Use a tripod or stabilize your phone against a stable surface to prevent blurry shots due to hand movements. If you’re in the vehicle, check if idling is enough to cause an issue in a test shot or two. If it is, either turn off the engine, or step out of the vehicle to get your shot. (Getting out will provide you with much better angle options too!)
- For smartphones, invest in a portable phone tripod or utilize the timer function to avoid camera shake.
Bulb Exposures:
For advanced users with DSLRs or mirrorless cameras, consider bulb exposures to capture intricate light patterns and extended displays by keeping the shutter open for longer durations.
Utilizing Filters, Lenses, and Bokeh:
Filters and Popular Camera Apps:
- iPhone: Experiment with camera apps and filters from Halide, ProCamera and Slow Shutter Cam. Your favorite social apps have built in filters you may like too – if you plan to only use your photos online.
- Android: Apps like Camera FV-5, Open Camera, or Lightroom Mobile offer filter options for enhancing your holiday light photos.
- dSLR and Mirrorless: If you’re shooting with a traditional camera, you’ve got a wide range of filter options available. Check out the starburst filters available from B&H Photo or our local favorite – National Camera Exchange!

Creating Bokeh Effects:
- Craft a bokeh filter from cardstock or black paper by cutting out shapes (like stars or hearts) and placing it over your lens. Start out with a shape between 1-2 cm in size. The perfect size for your lens will depend on the aperture you end up using. Here are some easy instructions.
- Blur out background lights by focusing on a specific light source or object closer to the camera, and using a wider aperture (or the portrait setting) to create a beautiful bokeh effect.
Get Creative and Plan Your Shots:
Considerations for Composition:
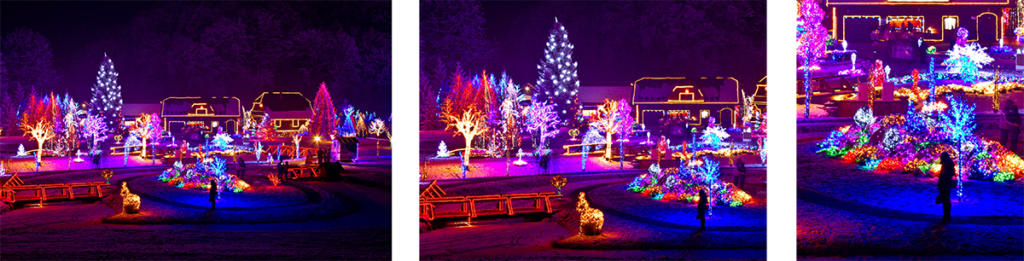
Color Palette:
Embrace the diverse colors of the lights. Experiment with contrasting and harmonious color schemes.
Leading Lines and Angles:
Use leading lines to draw attention to the focal point. Explore various angles to capture unique perspectives.
Foreground, Middleground, Background:
Create depth by incorporating elements in the foreground, middleground, and background.
Variety in Shots:
Capture wide, medium, and close-up shots. Mix vertical and horizontal compositions for diversity.
Shot Ideas:
Close-ups of Ornaments:
Highlight the intricate details of ornaments or decorations.
Portraits of Guests:
Capture the emotions and joy on their faces as they admire the displays.
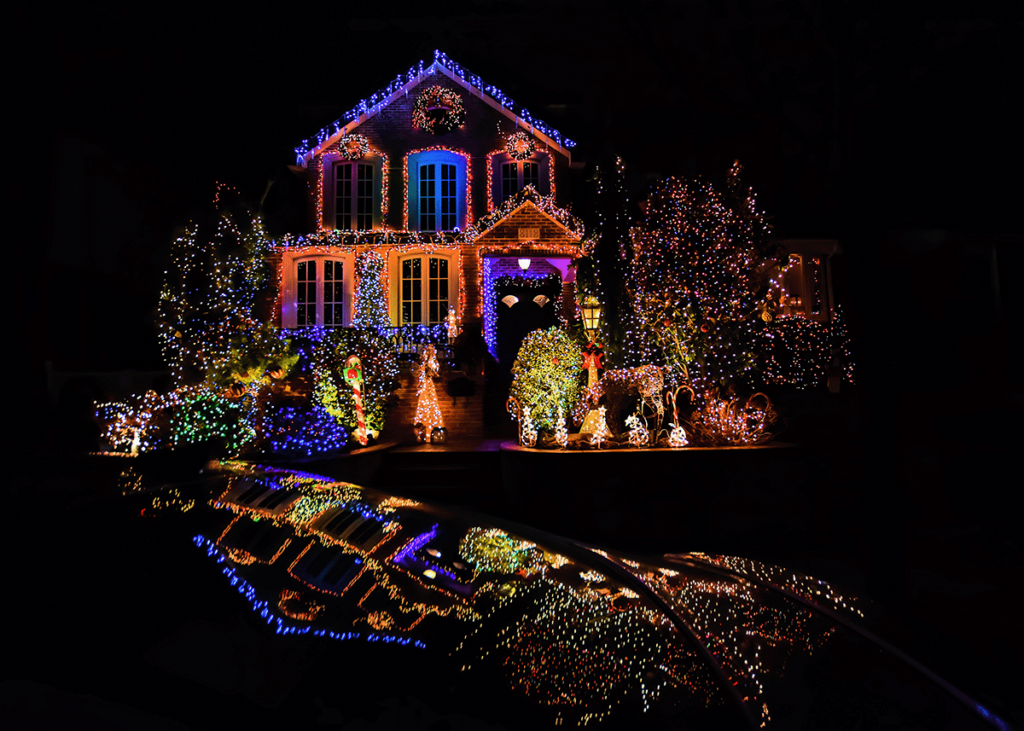
Reflections on Snow, Water, or Vehicles:
Use reflective surfaces to enhance the visual impact.
Creative Use of Negative Space:
Experiment with empty spaces to emphasize the lights.
Capturing the magic of holiday light displays involves a blend of technical finesse and creative vision. Experiment with these tips and techniques to immortalize the mesmerizing beauty of the festive season through your photographs. Remember, the key lies in exploring, experimenting, and letting your creativity guide you as you snap away at these radiant holiday scenes.
If you’re interested in a quick guide to the best holiday lights in town, check out the Holiday Lights Tours offered through Executive Transportation! Make it a fun-filled evening and start at one of our partnering locations for additional options for food and drink before and after your tour.
